How to Create a Self-Hosted WordPress Blog With Your Own Domain Name

I have been blogging for the past six years now (Since 2008). During this period, I have set up a lot of blogs. Some of them succeeded spectacularly, such as BikeAdvice.in and this blog DigitalDeepak.com. Some of them are performing moderately and continue to bring in passive income till today. Some of the blogs are for non-profit initiatives. Some of them died due to a failed revenue model, but they gave me experience.

A lot of people have asked me to publish a comprehensive guide to setup a self-hosted blog on a custom domain name. I have helped many people set up blogs. But surprisingly I never wrote an article about it, until now. Better late than never.
Here’s is a comprehensive guide to setting up your self-hosted WordPress blog on your own domain. I have tried to keep it short and simple. But if you find yourself stuck in some place, just leave a comment below, and I would be happy to help you.
Here’s what you will find in this article:
- Decide between free vs. self hosted WordPress blog
- The costs involved in running a self-hosted blog
Setting Up Your Self Hosted WordPress Blog
- Register a good domain name
- Get web hosting for your blog
- Install WordPress CMS on your host
- Choose a theme design for your blog
- Install essential plugins
- Install Google Analytics and configure Webmaster Tools
Free Vs. Self-Hosted WordPress Blog
A lot of people have this question. Why not go for a free blog provided by Google (Blogger.com) or WordPress? Why go through the hassle of setting up your self-hosted blog? There are plenty of reasons and benefits in a self-hosted blog. It is always a good idea to register your domain, get hosting space, install WordPress on it and customize it according to your needs.
Free blogs do not look professional. If you get a blog at blogger.com or wordpress.com, your blogging possibilities are limited, and you don’t own your domain and website. There are also some stories of people getting their accounts banned for no clear reason and their blogs disappeared into thin air.
Self-hosted blogs are owned by you and no one can take it away. No one can ban your account. You can completely change the look, feel and functionality of your blog. You can make your blog a commercial blog. Many free blogging services do not allow internet users to use their platform for commercial purposes.
So don’t even think about going the free route. Always go for a self-hosted blog like mine. It costs a bit, but the benefits are priceless.
Cost of Running a Self Hosted Blog
Having a self-hosted blog costs money. A lot of people wonder how much it costs to start and maintain a self-hosted blog. Without going into the specifics, here is a rough estimate of how much it will cost.
- Domain Name: $10 to $15 to register, $10 to $15 per year to renew.
- Web Hosting: You can get one for as low as $5 a month. That would be around $60 a year. As your website traffic grows, you may have to pay a bit more. I pay around $50 a year for all my websites.
- Content Management System (CMS): You have to install WordPress on your blog. WordPress is the best CMS available and it is open source! You will not get a better CMS even if you are ready to pay for it. You can download it for free from wordpress.org. However, if you want to upgrade specific functions on your website, there are free and premium plugins available.
Optional
You can invest a bit of money on logo and website design if you can invest and want to look more professional.
- Logo: You can get logos designed for $5 on fiverr.com all the way up to $300 in 99designs.com. I paid around $50 for the Digital Deepak logo which appears on this website.
- Theme Design: For theme design, you can check out studiopress.com where they have a lot of professional SEO optimized themes that you can buy and install on your blog. The cost ranges from $99 to $199. You can also get a custom design at 99designs.com.
Logo and theme design can also be done on a later date. But if you have money to invest, it is best to get the designs made upfront. Investing on the design makes your blog stand out of the crowd and also helps you become serious about it.
Now that you have a fair idea of how much it costs to run a blog. I am sure you will agree that the cost is not too much for the benefits that you get. I recommend that you read my post about the seven things you are losing because you are not blogging, you will get convinced that you should be blogging.
1. Domain Name
This is the most important step when you are about to start a blog. Domain name is very important because it is directly linked to your branding, and you cannot change it on a later date. A domain name is just like a username for your website on the world wide web.
A catchy domain name helps people remember better and helps them when they want to access your website. I always prefer a .com domain name because that is the first extension launched and most of the people end up visiting the .com version by default. You can get a .net domain name as the next alternative. In certain cases, it is OK to go with a country specific extension like .in (for India) or .us (for USA).
One of the basic requirements for a domain name is that the name should be catchy and shouldn’t be confusing. If you tell your domain name to someone on the phone, they should be able to enter your domain name on the web browser without any further questions or confusion. Domain hacks like using z instead of s and numbers in the place of words are not recommended.
Also, if the domain name has similar words and rhymes, it becomes easy to remember. For example, the name CocaCola is designed to be rhyming. However, you also cannot have a completely irrelevant name. It has to be meaningful and also relevant.
My domain name DigitalDeepak.com is meaningful and has a bit of rhyme to it. You have to strike a balance between meaningful, relevant domain name and a catchy name.
Here are my favorite domain name registrars. I have also reviewed them in this post. These registrars have two-factor authentication (2FA) and help in preventing your names from getting hacked.
- Name.com
- NameCheap.com
- Dynadot.com
Some of the other registrars I use include:
- Godaddy.com
- BigRock.com
- Hover.com
There is a marginal pricing difference between these registrars. Some registrars give you huge discounts for the first year when you register. The renewals costs are more or less the same in almost all the registrars in the world.
If you want a good .com domain name, you will discover that the name has been already registered by someone else long back. If you are ready to invest in getting a good domain name, you can check out premium domain name destinations like sedo.com and buydomains.com. I have invested in many premium names for my projects, and you will always get back your investment over time with a good domain name.
2. Web Hosting
A domain name is like a phone number for your website that doesn’t change. People find you through your domain name. But it is not the same with web servers. You can host your site on any server. Here is a quick illustration of how the domain name system and webservers work.
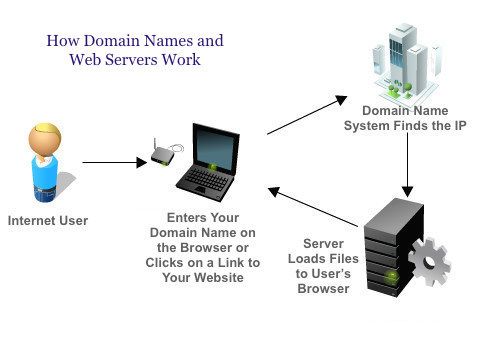
You can instruct your domain name to point to any computer on the internet. Each web server has an IP address on the internet. Your can point your domain name to this IP address, and the website files will load from this server when an internet users type your domain name in the browser.
A web hosting server is a computer that stores your website files. You can even use your computer to host your website and point your domain name to your computer’s IP address. But then your computer should be ON and connected to the internet 24/7 which is not feasible! That’s why we go with a server on rent.
When you buy a web hosting server, they will send you something called name servers along with a welcome email. These name servers contain the IP address of your web server. You have to enter these name servers in your domain name settings so that your domain name knows where to point the users when they are looking to access your website.
The process is much more complex than what I have described above, but you need not worry about that. The exact process differs a little bit from company to company. If you contact the support department of your domain name registrar or your hosting company, they will help you connect your domain name and hosting.
At any point in time, if you are changing your web servers, you just need to update your domain name with the new name servers so that it points to a new server. In this context, I also recommend that you read my article about premium DNS services like Amazon Route 53. I use a premium DNS for my website.
Here are some of the web hosting servers suitable for WordPress blogs that I recommend for beginners:
- Hostgator.com
- BlueHost.com
- Namecheap.com (also a domain registrar)
When you get more than 1,000 visitors a day to your websites, you can go for VPS servers. For VPS servers I recommend:
- WiredTree.com
If you get more than 3,000 visitors a day for your websites and if you need a top notch hosting company to host your WordPress blog, then I recommend managed WordPress hosting services such as:
- WPEngine.com
- Synthesis Hosting
- Pagely
Managed WordPress hosts cost a bit more than traditional hosting, but they will keep your website secure and backed-up every day. Managed hosting services also help your website to load fast because their servers are optimized just for WordPress. Faster websites deliver better user experience and also helps in having good search engine rankings.
3. Installing WordPress

After you have bought your domain name and hosting, it is time to install WordPress. Some hosts come with a feature called Fantastico that will install WordPress for you in a few clicks. I always install WordPress manually because manual installation is more secure.
When you install WordPress on your hosting server, there are two main parts to it. First is the files and second is a database (MySQL database). You need not go through the trouble of understanding how they work. You just need to understand how to make them work for you 🙂
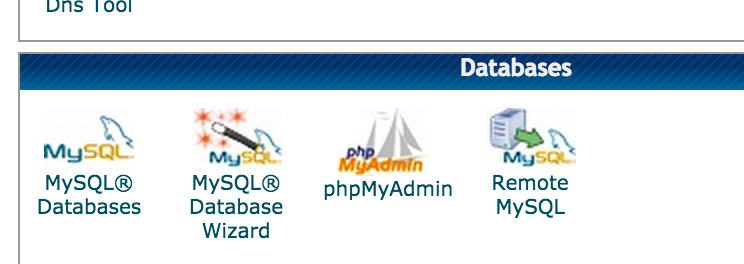
Most of the hosting companies provide you with an interface called cPanel. cPanel is a graphical user interface to operate your hosting account. Think of it as the operating system for your server. In the following steps I will show you how to install WordPress using cPanel. If your hosting company does not provide you cPanel, then the procedure would be similar. Here I will show you how to setup your database with cPanel.
Your cPanel username, password, and the login URL will be provided by your hosting company. When you login into your cPanel, you will be able to find something called MySQL database. Click on it and in the next page create a new database. You can give any name to it.
Next you have to create a new user for the database and then add the user to the database. The steps are quite easy and simple.
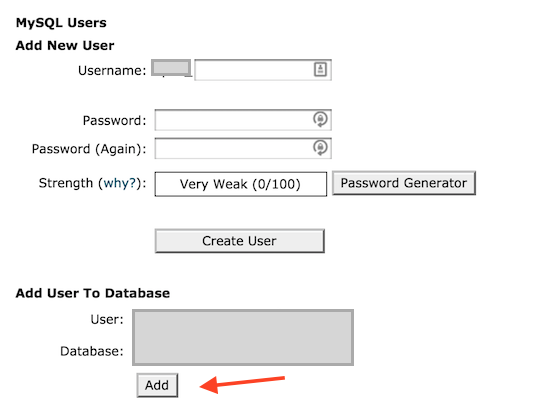
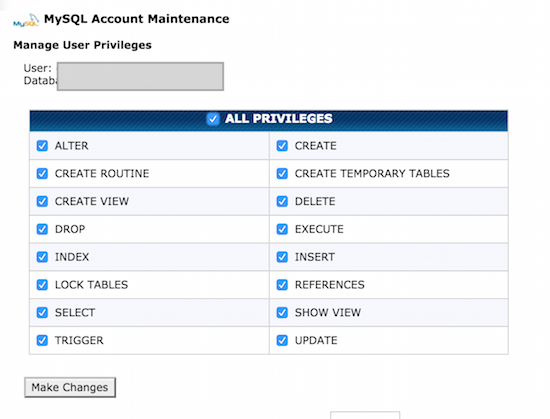
When you are adding a user to the database, you have to enable all privileges to that user.
Now that your database and database user is ready, it is time to install WordPress and link a database to it.
Go to wordpress.org and download your copy of WordPress for free.
Unzip the WordPress file and rename the file Config-sample.php to config.php. Open the file in a text editor and enter the database name, database username and database password in the file.
There is something called WordPress salt values. These are random values that are available at https://api.wordpress.org/secret-key/1.1/salt/ just copy paste them into config.php file. You should also change the table prefix from wp_ to something random. This is for security.
Save the config.php file. Upload all the files into the public_html folder of your hosting. To upload files you just need to go to the file manager in cPanel. Once you click on the file manager, you will get the following screen.
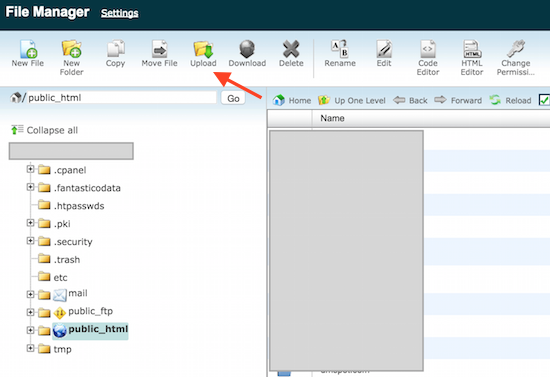
Click on the upload button and upload the files in the WordPress folder which you just unzipped. Take care to upload the files and not the folder itself. If you upload the entire folder, then your WordPress blog would get installed inside that folder, like: yourdomain.com/wordpress/. You want your blog to show up at yourdomain.com. So just upload the files inside that folder. You can also zip it, upload it and unzip it inside cPanel file manager.
Now things are almost ready. You just need to go to visit your website by typing the domain name in a browser and follow some simple steps to install your WordPress blog. You will be creating your admin username and password in this step.
During the entire step, you would have created many usernames and passwords. Here are the things you should remember (or save it in a safe place):
- Domain registrar username and password
- Hosting account username & password (billing and cPanel)
- MySQL username
- MySQL user’s name and password
- WordPress admin username and password.
I recommend that you use a password manager like KeePass or LastPass to save all your passwords in an organized manner. Do not just write it down in an in a notepad. Also do not save these details in an unencrypted text file in your computer.
If you tried to install WordPress in the first attempt, you might have failed. Nothing to worry! You can try it a few times, and you will get it right the second or third time. I will be creating video tutorials for installing WordPress, once they are ready I will embed them here. The video tutorials will walk you through the entire process step by step.
Until now we have discussed about how to get your domain name, web hosting and install WordPress in it. Things are not over yet. There are a few more things to tinker around before your blog becomes 100% ready to help you with your goals.
4. WordPress Themes
Once you install WordPress and login into your dashboard, you will find many different WordPress themes which you can install for free. I do not recommend sticking to the default WordPress theme because it will not set you apart from the other blogs on the internet.
You can choose a free theme, or you can buy a premium WordPress theme. Some of the premium WordPress themes I recommend are
- Thesis theme from DIY themes
- Studio press themes by CopyBlogger media
Just search for premium WordPress theme on the internet and you will find so many themes that you will spend the next few days browsing for themes 🙂
I use thesis theme & framework for this blog DigitalDeepak.com
5. Plugins to Install and Configure

One of the best features of WordPress is that it comes with a host of different free and premium plugins to help you publish according to your requirements.
Here are free plugins you should install and activate:
- Akismet: Helps you prevent spam comments on your blog. Free to use. You have to register for a WordPress.com account and get the API key.
- All in One SEO Pack: Helps you optimize your blog and inside pages for the search engines. Some themes have SEO options built in.
- Google XML Sitemaps: Helps you create sitemaps (a page will links to all the pages on your website). You can see mine here: /sitemap.xml This helps search engines track new pages on your website.
- WP Touch: A plugin that will make your website available for viewing in mobiles. One of the best plugins for WordPress.
I usually have only the essential plugins on my blogs. I will not install a plugin unless it is necessary. That is because I follow a minimalist approach.
Some blogs need more plugins. You will be able to find many plugins for the following enhancements:
- Facebook Comments on Your Blog
- A plugin that displays all social sharing buttons on your posts
- Related posts plugin which will automatically display related posts below every post
- Contact form plugin which you can embed on your about, contact or advertise page.
There are thousands of different plugins suited for your specific needs in the WordPress plugins repository.
6. Install Google Analytics and Configure Webmaster Tools

Setting up Google Analytics and configuring Google Webmaster tools are a part of your blog setup. Without Google Analytics, you wouldn’t know who visits your websites. from where they come, how long they stay, what pages they visit, how quickly they leave your site and so on.
There are many other website analytics tools available but Google Analytics is what I recommend and what the industry recommends.
First, you have to create an account in Google Analytics. The steps are pretty simple and straight forward. Once your account is created you will get a code with a unique identifier like UA-XXXX. You have to include the code on every page on your website so that Google Analytics can collect data from your website.
And yeah, there is a WordPress plugin available for that too. It is called ‘Ultimate Google Analytics’. Some WordPress themes come with in-built functionality to include Google Analytics code and in such cases you need not install a plugin.
Google Webmaster Tools: Google Analytics helps you find out what happens on your website once people visit it. But Webmaster tools helps you find out what is happening outside of your website.
Mostly, webmaster tools has to do with the Google search engine. This is something you cannot ignore because Google has the largest share in the search engine market and you will get a lot of visitors from Google organic search.
In this blog, I have already published a complete guide to Google Webmaster Tools. After you read it, you will be able to create an account, verify your website, add a sitemap and start using all the features of webmaster tools.
Conclusion
I hope this blog post helps you setup your WordPress blog on your domain from scratch. Obviously, setting up a blog and publishing articles is not going to be enough to reap the benefits from blogging. Marketing your blog is very important.
That’s why, in the next blog post I will write extensively about marketing your blog. The marketing techniques that I will write about are the ones I use to market my own blogs and they are proven to work!
If you have any questions, leave a comment below. I look forward to seeing your blog.

If you are looking for a reliable hosting company, I recommend BlueHost.