Facebook Live Videos Using DSLR Cameras and Wirecast: The Ultimate Guide

Have you ever tried doing a Facebook Live video? Live videos get high engagement on Facebook compared to other posts. We’re also wired to pay attention to something that is going on Live right now. Whenever I get a notification that someone is Live, I cannot resist checking out what’s going on the other side.
We’ve come a long way from the initial days of content replication. We started with written words on cave walls. Now we have the power to stream live videos, for free!
I’ve been doing some professional live videos on my FB page and the response has been great so far. A lot of research has gone into finding out the best possible, portable and affordable pro live-video setup.
The following topics will be covered in this post:
- Benefits of doing professional live videos on Facebook
- Equipment list and cost
- How to setup live videos from your FB Page
- How to use Wirecast to do the live stream
I. Benefits of Doing Professional Live Videos
There are a lot of hidden benefits to having this professional setup apart from the higher audio and video quality. I want to first convince you the benefits of this pro setup, before telling you how to do it. Because it is not cheap and it is not easy. But once you understand the benefits you will be motivated to go the extra mile to do videos this way. And it’s fun too. 🙂
1. Additional Effects on Videos & Live Editing
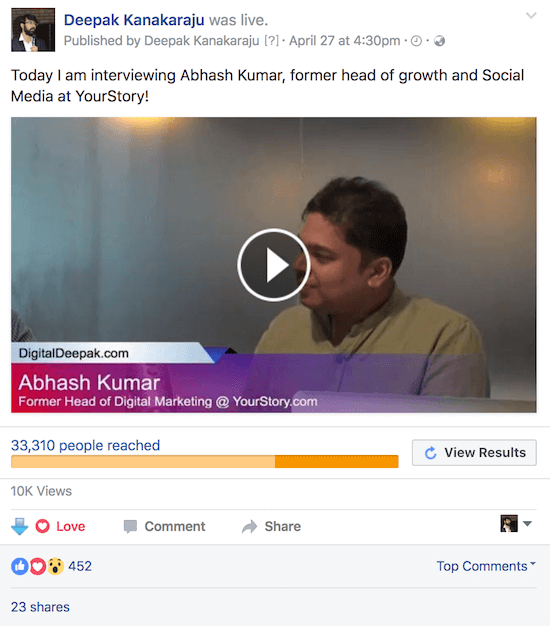
Here’s a recent video I did with the former digital marketing head of YourStory. You can see that I have added text overlays and used multiple camera angles. You can check out this video on my Official Facebook Page.
I can change the camera angles while the video is streaming live. All it takes is a click on the Wirecast window. This makes the entire video very professional.
After the video has finished streaming live, there is nothing else to do. I don’t need to work on editing the video again because I’ve already done the editing, live. The recording of the live stream will be available on the same YouTube URL or the same Facebook post and I can just let it be, enjoying the passive view it would keep getting for a long time.
2. High Organic Reach on Facebook
The organic reach is awesome with Facebook live videos. You can see that even without paid promotion it has reached 22,720 Facebook users.

I’m sure with Facebook live videos you can reach a lot more users than having your video on YouTube. This is because Facebook sends out a notification to many users announcing that you are Live. The good thing about these type of live videos is that the video gets a lot of views after the live video is over. Facebook shows notifications to users as ‘Deepak was live’.
Usually, my recorded videos, posts or photos reach a maximum of 10,000 people organically on my page that has 135,000 likes right now. But this live video has got more than 2x the organic reach.
3. Schedule Live Videos and Let Your Audience Tune-in
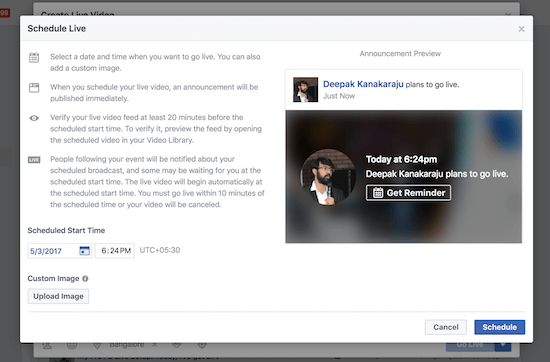
On Facebook, you can also schedule the live stream and then let people get a reminder for the live event if they choose to. This option is only available for Facebook Pages and not personal profiles.
I’ve noticed that whenever I schedule a live video a day before, the total number of live viewers when we stream it is always 2x or more compared to doing a live video without scheduling. The scheduled post reaches 1000s of people even before the live stream is done.
(Note: You cannot schedule a live video using your mobile phone.)
Scheduling a post helps us to:
- Reach more people even before the live stream starts, which leads to…
- Getting higher engagement during the live video, which leads to…
- Getting more comments and shares on the live video, which leads to…
- More reach after the live video is done
I believe that you would agree with me when I say the investment on this setup is justified because you end up getting higher engagement without spending money on Facebook ads!
4. It’s Fun and People Take You Seriously
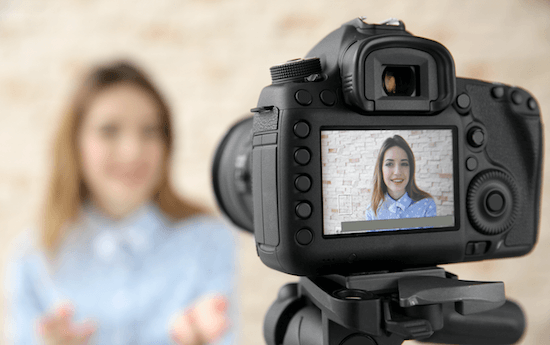
Its fun and exciting to do a live video. Live videos could be interviews, speaking events or entertainment shows. Here, we are mostly discussing it in the context of vlogging, webinars, and interviews.
Stress, Anxiety & Fun: If you are doing live video interviews, you may also get a lot of anxiety the first time that you do it because if you do a mistake like say something wrong or behave in a way that is not appropriate, there is no way to edit it out. It would have reached many eyeballs already. But if you can get comfortable in front of the camera, you will soon start having a lot of fun doing this.
It is also easier to convince people to do a live video interview with you: because it takes a higher level of effort to do this and they will take you seriously.
Live Video Interviews are better than:
- Text Interviews: Text interviews doesn’t take much effort and doesn’t get that much engagement.
- Recorded Video Interviews (In-person): Recorded in-person videos are not that fun either. Because the internet is exploding with content and there are too many videos to watch on the web. If it is not live, then it is not live. It doesn’t matter if it is a recently shot video or a very old video. We can’t watch all the videos on YouTube even if we had a lifetime to do it.
- Live or Recorded Skype-call type interviews: Live or recorded video interviews (where both parties are not at the same place) such as skype calls with two heads leaning towards the camera and discussing stuff is also not that great. And I haven’t made such videos yet!
- Live or Recorded Webinars: Webinars are ok, but you are still not showing your face and talking to your audience or you are showing your face in a small square box with a low-quality video feed from your webcam. You can still share your screen on webinars but having a full-screen video intro in a live video will always capture more attention.
Live videos work because your audience loves to see you in real life – as a real person, as it happens. This will increase trust, engagement, and fan following! This is very important for any blogger or influencer.
You Need a High-speed Internet Connection
The only downside of Facebook Live videos that I see right now is that you will not be able to stream a good video if you do not have a good internet connection. The last time I did an interview with the CEO of UpGrad, I had some internet issues. The live stream went mostly OK, with some hiccups in between.
When I checked the recorded version of the same video, I noticed that the audio and video went out of sync. Since then, whenever I feel that the internet connection is not that great, I try to stream it at 540p or 480p instead of 720p. And don’t stream at 1080p unless you have a 200+ Mbps internet connect with low latency. 720p is good enough in most of the cases.
II. Tools You Would Need for a Professional Live Stream
There are quite a few things you would need to pull off a live stream like this. Here’s a list of things you would need:
- HandyCam or High-end DSLR Camera (around $1,000)
- High-Quality Microphone (around $200)
- One Tripod for Each Camera (around $50)
- Wirecast Software by Telestream ($500)
- Blackmagic Design UltraStudio Mini Recorder (around $200)
- HDMI and Thunderbolt Cables (around $60)
- A High-Performance Laptop or a Computer ($2000 to $3000)
The total cost is around $4000 (~2,50,000 INR). Assuming you have a good computer already, the cost would then be around $2000.
If you are going to have a 2 camera setup, add another $700 to $1000 to the total cost. This is the total investment required to make it awesome.
Let’s review each of the equipment before diving into how to get this done with Facebook and Wirecast.
1. A Handycam or a High-end DSLR Camera
This will be your main video capture device. You can have one or two HD cameras. Make sure that the camera can record 1080p at least. If you have two cameras, you can have two camera angles and switch it during the live video.
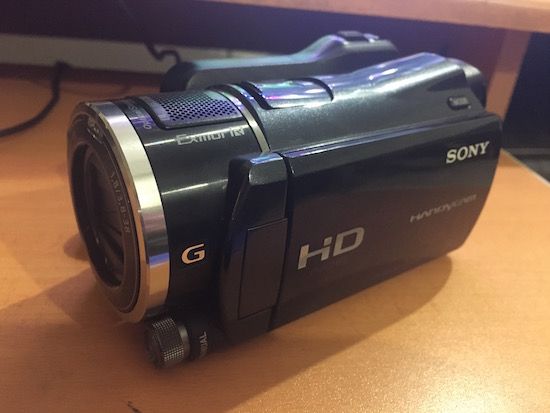
Handycam works better than DSLR cameras because the video feed is smoother. If you are using a DSLR, make sure it is a high-end one. More often than not, there is a significant lag with low-priced DSLR cameras. I use an old Sony HD Handycam, that I purchased in 2008 for around Rs.60,000.
2. Studio Microphone
A high-quality microphone is really important for doing a professional live stream. Audio quality makes up for half of video viewing experience. I use a Yeti Studio microphone, that I also use for recording my courses.
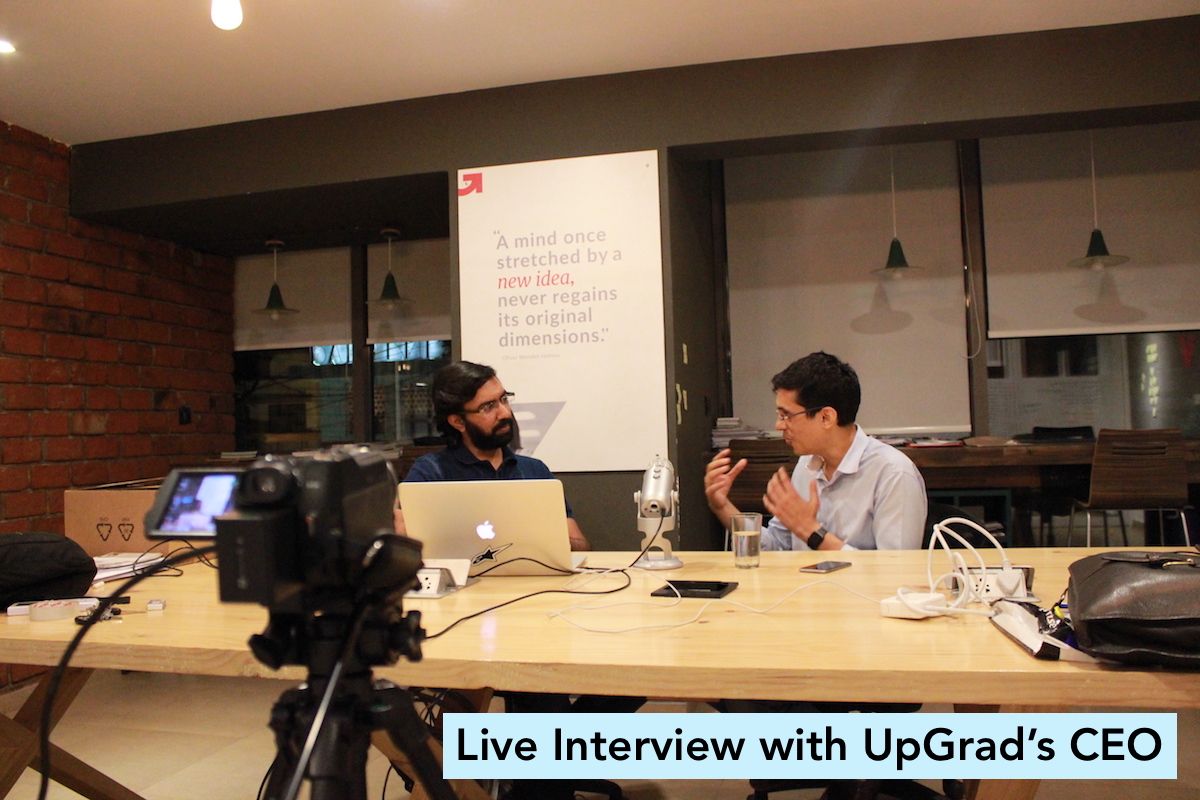
In the above pic, you can see the camera and the mic that I used recently during a live Interview with UpGrad’s CEO. I keep the mic on the desk and feed the audio directly into my computer via USB (digital USB signal is better than an analog one).
The good thing about the whole setup is that apart from the tripod, everything else fits into my backpack. I am a mobile live studio on the move!
3. Tripod
I use a Sony and a Hama tripod. The Hama tripod can rise up to 5.9ft in height so that I can stand and talk. The Sony tripod is smaller and fits easily into my backpack too. It has a total height of around 4ft, enough for an interview that we would do sitting. Any tripod is fine as long as it can do the job. A good quality tripod will cost around $50 to $100.
4. Wirecast by Telestream
Wirecast is the best software in the market right now that can handle a studio-level professional live stream. The software would cost you $500 for a one-time purchase.
Here’s a small trick to save 5%: Go to the order page and try to exit the website by moving the mouse outside the browser window. You will see a popup with a 5% off! You can get Wirecast for around $470 with this small trick!
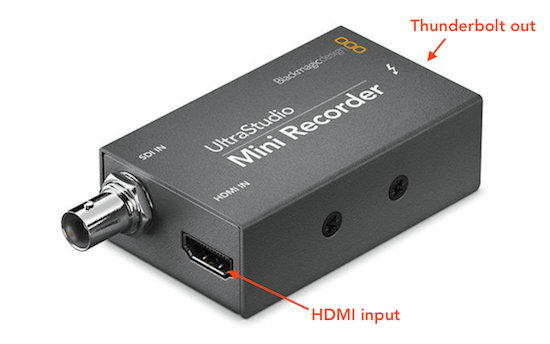
5. Blackmagic Design UltraStudio Mini Recorder
This is one of the main components in the entire setup. This device takes the HDMI output from your camera and converts it into a thunderbolt input into your computer.
I am using a MacBook Pro 15″ and it has two thunderbolt inputs. That means I can have two camera angles for my live stream by feeding in two inputs.
You can find out the local dealer in your city from Blackmagic Design’s website. You can also find this on Amazon and eBay. The cost is around $200 for this device.
Note that you cannot take the HDMI out from the camera and directly connect it to your computer’s HDMI port. It would fit, but it wouldn’t work because the HDMI port on your computer is an output and not an input.
6. Cables
You will need a mini-HDMI to HDMI cable that takes the camera’s feed and passes it to your UltraStudio Mini Recorder. HDMI cable would be less than $10. And you will need a thunderbolt to thunderbolt cable to connect your UltraStudio Mini Recorder to your computer or laptop. This would cost around $50 from an Apple store. I recommend getting a 2m cable than the 0.5m cable.
7. High-Performance Laptop
I recommend using a laptop so that you to take it anywhere you want, esp. to the places where you would want to do the live stream from. Unless you have a studio where you will do most of the live stream, I wouldn’t recommend a desktop.
I have a 13″ and a 15″ MacBook Pro and I discovered that the 13″ is not capable of handling Wirecast and live stream. Wirecast consumes a lot of CPU resources and the minimum configuration that I would recommend is Core i7 or equivalent with 16gb RAM.
Also, make sure that you have the power plugged in throughout the live stream because the battery could run out in less than 30 minutes with Wirecast doing a live stream on Facebook.
III. How to Setup a Live Stream Event on Facebook
Now that you have all the tools required to do a live stream, let’s discuss how to actually pull this off. I recommend that you do a few samples before you get comfortable with the entire process.
In this section, we will focus exclusively on Facebook Live Stream. In the later section of the article, I will show you how to stream the same feed to YouTube.
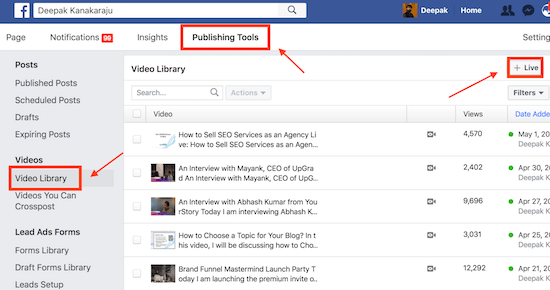
Go to your Facebook Page and click on Publishing Tools. Click on Video Library. And Click on +Live.
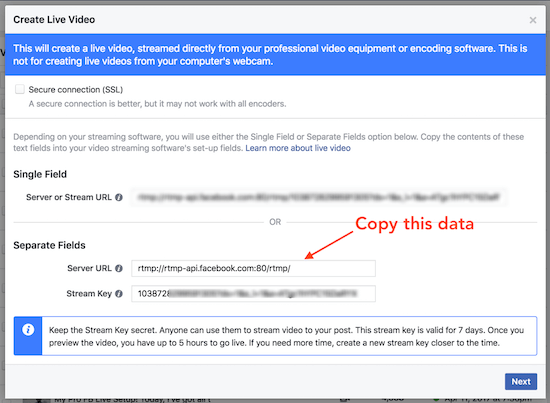
You will see a screen like this which will show you the RTMP Server URL and Stream Key. Copy them and put it on a text editor where you can fetch them later easily. RTMP is a protocol just like HTTP which is used for transferring live stream data.
Now click on Next in the above window.
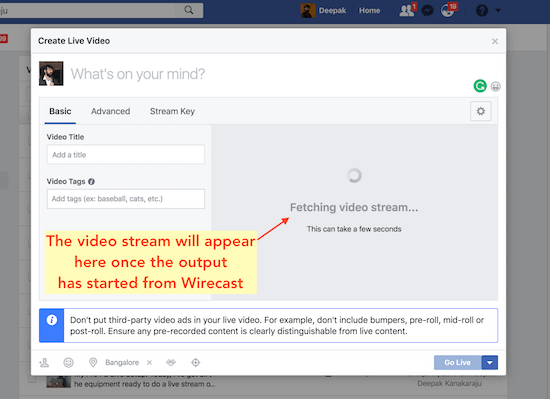
A screen like this will appear and Facebook will wait for your live video input. After 5-10 seconds, Facebook will report an error that it is not able to fetch any data because the output from Wirecast has not started yet. It’s ok.
If you want to schedule the live video, you can click the down arrow near the Go Live button and click on Schedule.
You will see a screen like this where you can schedule the live video on a specific date and time. You can also upload a custom image here which would appear on the circle. You can upload a square image and it would show up as a circle.
Once your live video is scheduled, the live stream will automatically start at the scheduled time.
If you do not pass any data to the server URL for up to 10 mins after the live stream has begun, your live stream will get canceled. Try not to do that as much as possible.
Wirecast has options to login into Facebook directly, but I would recommend using the RTMP server.
By the way, do you know what RTMP means? It is a protocol like HTTP. Here’s what Wikipedia has to say:
Real-Time Messaging Protocol (RTMP) was initially a proprietary protocol developed by Macromedia for streaming audio, video and data over the Internet, between a Flash player and a server. Macromedia is now owned by Adobe, which has released an incomplete version of the specification of the protocol for public use.
IV. Using Wirecast to Live Stream to Facebook
Wirecast is a pretty amazing tool. In this section we will cover:
- Preview and actual live video
- Video Editing Pane: Adding audio source, video source and effects.
- Output
- Live Editing
Preview and Live Video
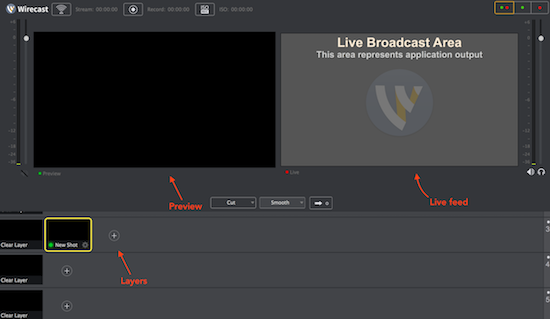
As soon as you open Wirecast, you will see two main video windows. The one on the left is the preview window which is ready to go live. The one on the right is the actual live feed that is being sent out. When you click the -> arrow, the preview will become live.
Video Editing Pane
The video editing pane has several layers. If you want to add overlays, you need to add the actual video feed in the 3rd or 4th layer and then add the overlays above it. If you add the video in the first layer, it will block out all the remaining layers below.

Click on + in one of the layers and select UltraStudio as the source of the video. You can select the audio source as the same if you want the audio to be picked up from the camera’s mic or you can have a separate mic and use it as an audio source.
Make sure that you do not select two audio sources because that would create an echo. (The first time I did a live stream, I had audio sources both from the camera and the studio mic and hence it created an echo).
Output
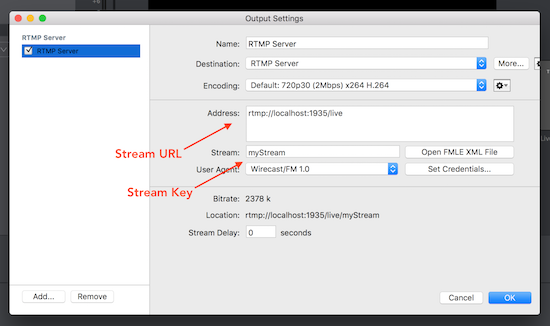
Once your live video feed is ready to go the way you want, go to Output and click on Output Settings. You will see the following window where you can enter the Stream URL and the Stream Key. You will find this data in your clipboard that you had copied when you had set up the Facebook Live event (explained in the previous section).
Once your video is ready to go, go to Output and click on Start/Stop Broadcast and select Start all.
Live Editing
If you want to change the camera angle during the live feed, select the video source in one of the layers and it will show up in the preview pane. Click on the right arrow to take it to the live feed. You can do this during the live video stream.
Live Streaming on YouTube
You can stream the same video to YouTube as well, while you are streaming it to Facebook. You can also stream it to multiple YouTube URLs and multiple Facebook Posts.
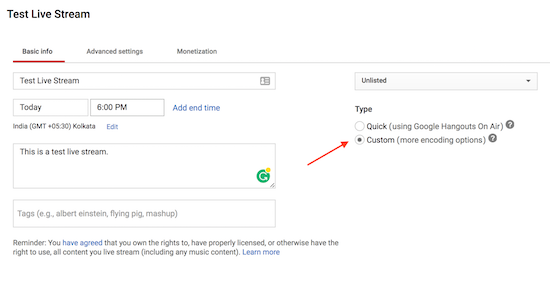
Since you are streaming the video via an RTMP server, the steps are similar. Just create a YouTube live event, select Custom instead of Quick in the settings.
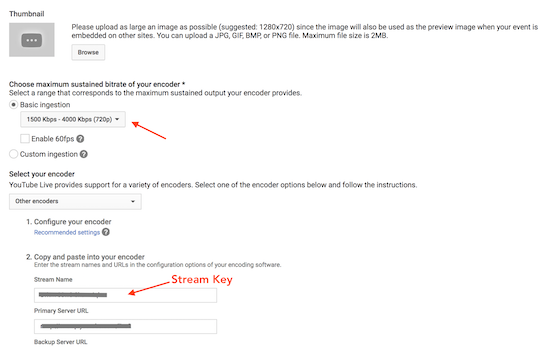
Go to Ingestion settings to get the stream URL and the stream key. Select other encoders here instead of Wirecast, unless you want to log in from Wirecast.
I haven’t used YouTube live much because Facebook has always given me higher reach than YouTube, esp. for live videos.
Final Words
I hope this article gave you a clear step-by-step guide on how to do a professional live stream on Facebook and YouTube. I will also post an in-depth tutorial on how to use Wirecast. Stay tuned!
Any questions? Leave a comment below!