How to Create Animated and Professional Videos Using Apple Keynote

This is a comprehensive and a detailed step-by-step guide on how to create presentation style words-and-pictures video using Keynote. Videos like these are becoming popular nowadays because they are more engaging than reading an article.
The Keynote software is similar to Microsoft PowerPoint for Windows, but has more features and capabilities for video creation than PowerPoint. Keynote is available in the App Store at a very affordable price of $19.99 for the Mac Operating system.
Keynote is not being advertised as a video creation software. Keynote is supposed to be a software for creating presentations but for more than 90% of the time I use Keynote to create amazing videos for my business.
The big advantage of Keynote is that it is can be a stand-alone software for creating videos. Which means that you need not combine the entire process with other video editing softwares such as a Camtasia or Screenflow (both are great screencast/screen recorders with editing features) to create the final video. The entire video can be made just using Keynote and the results will be spectacular.
Also the process is quick and simple. You may not be able to customise some parts of the video as much as you would like to but if you want to create a lot of informative videos quickly then Keynote is the software of my choice.
What Kind of Videos Can You Create with Keynote?
Before we start discussing about how to make videos with keynote, first let us define what kind of videos we will be creating using Keynote.
With Keynote you can create infomovies. Infomovie is a term that I coined which means an informative video. Just like infographics which is defined as the visual representation of data and information, an infomovie is an audio visual representation of information. An infomovie is basically a presentation style video with a voice over. It is a better way to read an article online. It is engaging and easy to learn the concepts which is attempted to communicate by the author.
Whether people call it by this name or not, most of the video sales letters are infomovies because there is no camera footage in the “video”. Video sales letters are usually the text in the sales letters with voice over and slides – which means, according to our definition, are infomovies!
I created an infomovie for my previous article about how to embed clickable links to your website in your YouTube video. You can watch it here below. At the time of writing this article, the video has more than 8000 views. Definitely more than the visits to my article.
In fact this very article will be converted into an infomovie after a few days of publication and I believe it will reach a wider audience. However also keep in mind that a lot of people (like you) love to read article rather than watch a video because articles can be scanned quickly whereas a video has to be ‘sat through’ until it finishes.
Another great benefit of infomovies is that the information is transferred to the viewer faster than a talking head video and should have better engagement (yet to statistically test it). It is a proven fact that talking head videos are boring unless the reader has a connection with the person.
I hope you learned about the benefits of infomovies. Now let us get into the details of how to create infomovies using Keynote. You can also create such videos using Microsoft PowerPoint but it is not easy and effective (and beautiful) as using Keynote.
Creating InfoMovie type Videos using Keynote
Before you get started with the video, it is important to decide upon the resolution of your desired online video (infomovie). Depending on your requirements you may need a 4:3 or 16:9 aspect ratio video. If you are uploading your videos to YouTube for marketing and driving traffic, I recommend 16:9 aspect ratio with 854 x 480 pixels (480p) or 1280 x 720 pixels (720p).
If you are using a 13″ MacBook Pro, creating a 720p video can be quite challenging because of the limited screen size. I have a 13″ MacBook Pro but I work around the problem by connecting an external monitor and I would recommend the same for you.
Step 1: Open Keynote and Set the Desired Resolution
First step, open the Keynote software from the application folder or your dock (if available).
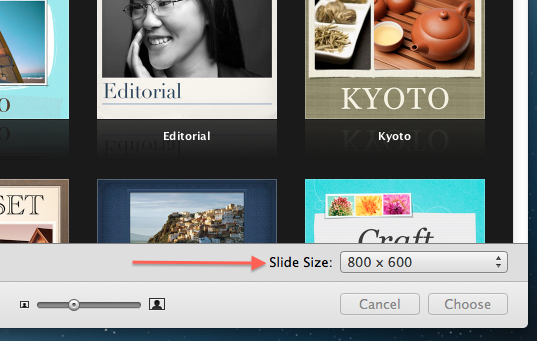
Click on ‘New Document’ and then select the slide size. For 4:3 videos, I recommend 800 x 600. For 16:9, select 1280 x 720. You will notice that there is no option for custom slide size if you want to choose something like 854 x 480 as mentioned earlier. Don’t worry, you can select it later from inside the settings. Just select any size for now.
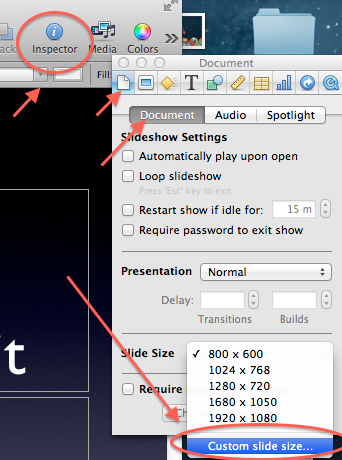
To change the slide size to custom size, click on the Inspector – the blue icon with an i. Click Document on the document inspector, select slide size and select custom. You can enter a custom width and height there. See the image below for reference.
Once the size is set, your canvas is ready and is waiting for you. You may have selected a slide theme at first but you may want to change it if the current one doesn’t suit your needs. Also you can make a custom background for your videos and is recommended for branding especially if you are uploading them to YouTube.
Step 2: Set a Custom Background Image for Your Slides
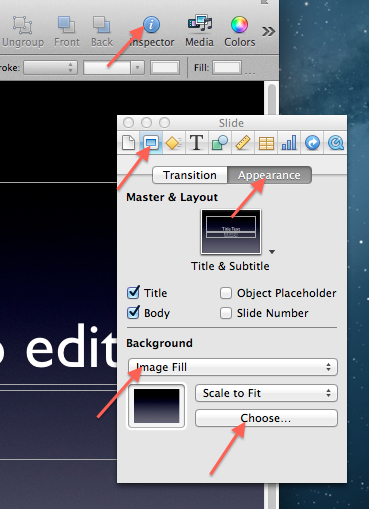
To include a custom background for your video go to Inspector > Slide Inspector > Appearance > Background as Image Fill > Choose. You can refer the following screenshot to know how to navigate through it.
The inspector can be tricky at time confusing us with the various similar named options. It would be good to refer back to this guide when in confusion. (I do it myself!).
Step 3: Include Text and Images in the Slides
This would be the most time consuming aspect of the entire video creation process. If you are creating an infomovie as an ‘video article’ or a video sales letter, you should start preparing each slide for the video. Include text and images in appropriate places and finish the entire process. Usually we create 10-15 slides for a 300-400 word article. You can create more slides to create better engagement. It has been proven that user’s attention span gets reset when they are watching moving objects on the screen – so engagement, time spent on the video and ‘stickiness’ will be more.
If you include 2-3 sentences in each slide then the number of slides will be relatively less. You can include 1 sentence in each slide and include an image and make the number of slides higher. If you are creating a video sales letter, then I recommend creating as many slides as possible because engagement is crucial for higher conversions in sales videos.
Font Size: Take care not to make the font size too small. It would look good while editing in the Keynote but when you upload to YouTube you have to remember that though you upload your 4:3 video in 800×600 pixels, YouTube will resize it to 640×480 (480p) and most users would watch it in a lesser resolution (480 x 360) which is default for displaying videos on YouTube. Do not include more than 6 lines in the presentation and you will be fine.
Fonts to use: Also remember to use sans-Serif fonts instead of Serif fonts. Serif fonts such as Georgia, Times New Roman were designed for print publications where the ‘display resolution’ and pixel density was much higher. Sans-Serif fonts such as Arial and Verdana were designed for low resolution computer screens. But recently since computer displays have evolved, everyone is using Serif fonts for online as well but since we have a low resolution for YouTube, I recommend using sans-Serif fonts, especially arial for clear look of the text on the videos. You can try using Serif fonts and see what damage it does to readability – the text will become crumpled and really ugly!
Including images is very easy in Keynote. Just copy an image from a browser and paste it directly in your keynote slide. I usually just copy the images I have already published in my blogs and just include them in Keynote. No need to save the image files and insert them separately.
Step 4: Animate Your Text and Images
Keynote is a powerful software for creating animations. And doing it is very easy with the pre-built animation templates. To animate your content, select your content, open the inspector and click the build inspector as shown in the image below.
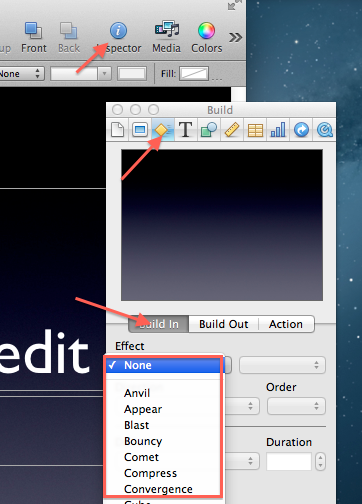
There are two types of builds (animations). One is build in and the other is build out. Build in is used for animations which introduce the text or image and build out animations are used to make them go away from the screen. Usually I do not use build out because there is a build in animation for the second slide anyway so that I can just make the entire first slide disappear instead of adding animation to it thereby making the video faster and quicker.
You will see that there are a lot of build in animations available. My favorite ones are:
- Convergence
- Cube
- Dissolve
- Pop
- Scale Big
- Move In
What animations to use is entirely your call. For some videos I would just stick with the dissolve build to keep the elegance and professional touch in place. For some topics I would go ahead and use some funky builds.
If you want to move your images inside the slide after including builds you can use the action feature. For example if you have a big long image with with several items in it (say, a bunch of company logos), you can use the action feature to scroll it from top to bottom. I won’t go in depth about the action feature here in this post because it is rarely used. If you really want to use it, you can learn how by playing with it for a few minutes. Note that it would be tricky at first.
Step 5: Adding the Voice
This is another important part of your video if not the most important. Some experts say that audio is 50% of the video. People will watch your video if it has excellent voice and average visuals but they will not tolerate a crappy voice and music even if the video is a hollywood style one.
There are two options to choose from when adding the voice to your presentation video. First one is that you can just hit the record button and narrate extempore with the slides in front of you. Second and my preferred option is to record the voice first and then sync it with the video. We will look at both of them here.
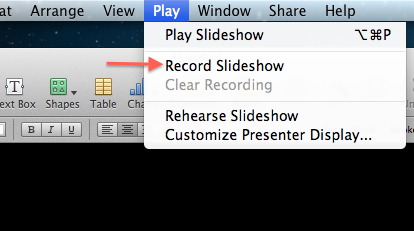
Option 1 – Extempore Voice: Now that you slide is ready and everything is on your mind, it is time to record your audio. In the menu bar you will find ‘Play’. Click on it and click Record Slide Show. See image below.
With every click of the mouse button or the right arrow button in your keyboard the text and images will build in one by one. You can just narrate whatever is on your mind and once you are done, the voice and the timings will be saved in the Keynote file. To export the file as a video, follow the instructions below described after the section on the prerecorded voice.
Option 2: Recording the Voice First and then Sync’ing
In this method you will first create the audio and then sync it with the video. I prefer this method because I do not give the voice for my videos most of the time. I outsource the voice recording to professional voice over artists who record my scripts professionally in a studio and add some enhancements to it after the recording such as noise removal and adding a light background music.
I usually request the audio files in .wav format since it is uncompressed and is good for video editing purposes. Eventually, your audio will be compressed when you export the video and upload it to YouTube or other video sharing sites. It is recommended to compress the audio only once. If you ask the voice over guy to deliver in MP3, it may be easier for you to handle because of the low size, but the file is already compressed and when creating the video, it will go through another compression process. So keep that in mind – audio in .wav format.
The audio outsourcing can be done even before you start creating the keynote file. Usually the video creation process that I follow is as follows…
- Identify Keywords
- Create Articles
- Outsource articles to be converted into audio recording
- Create keynote presentation with build effects.
- Timing the Keynote file with the audio file
- Exporting it as a Video
Timing the Audio File with the Video: This is an important part of the video creation process using Keynote. This is the last step that you have to do before the final video is done.
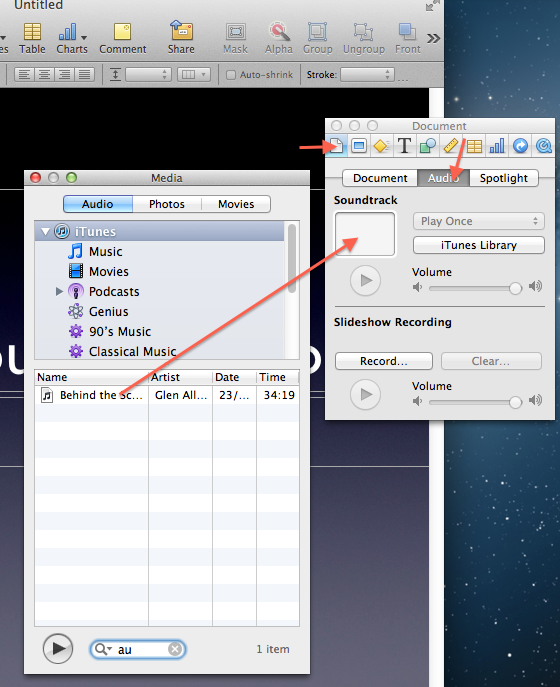
First import the audio file into iTunes. If iTunes is your default audio player, just opening it will import it into iTunes. In Keynote, go to inspector, click the document inspector, click the audio tab, click on the iTunes library select the audio file and drag it into the box as shown in the screenshot below.
Go to play and click on Record slideshow as I have show in the image before the one above. The slideshow will start playing with the voice-over that you just imported. You just have to time the animations and build in of the text and images so that it matches with the audio being played. If your audio is 5 minutes long then this process would take the same amount of time. When you are in the last slide and the audio finishes playing, do not click the next button and finish the video, wait for 5-10 seconds. I recommend this because one should not have the feel of the video having ended abruptly.
You can also choose to include an outro or fade out music at the end of the audio to give the video a smooth ending. Another great reason why I like to include this delay at the end is because if you are uploading the video to YouTube, then after the video finishes playing for the internet user, YouTube will show suggestions for other videos and they may immediately jump on to it. If you have a few seconds gap, then the user may click the link in the description below your video or check out more of your videos in your channel. You can also use annotations with links to channel subscription or other videos that you have uploaded in YouTube.
You may not get the timing right in the first attempt. You may want to try once again if you are not satisfied with the sync. Once you start creating a lot of such videos, you will start getting it right in the first attempt.
Now that you Keynote file is timed and ready for export. This is the last step in the process.
Step 6: Exporting into a Video (Yaay!)
You have worked so hard to create the entire presentation; adding text, adding images, adding effects and timing it. Now it is time to let Keynote do rest of the hard work. The fruits of your labor is near.
At this stage you should not edit any elements on your presentation. If you do, the timing will get messed up and you would need to do the ‘Record Slideshow’ timing process again.
Go to File > Export

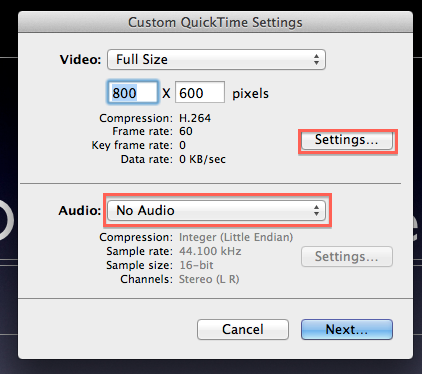
You will be presented with the following options. If you have already timed your presentation, then you will see that the option for ‘Playback Uses’ would be selected in ‘Recorded Timing’ by default. If you choose manual advance, you can make the slides and builds appear one by one with mouse clicks or arrow clicks even in quicktime, but we are not interested in that. We need a video which would play automatically. In the format, select custom.
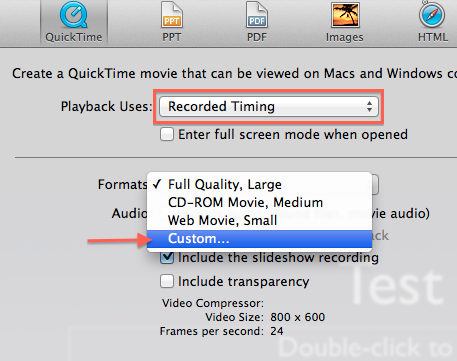
Choose the video dimensions here in the custom quick time settings. This is usually the size of your slide. In the Audio selection, you should select ‘No Audio’. This is a little confusing at first because we want a video with audio. But just choose no audio and the video would turn out fine with the audio file that you imported into document inspector. We are choosing this option because when you recorded the slideshow, apart from the audio file that you imported, Keynote would have recorded the background noise through the microphone and we don’t want that in our video. You will not notice this background noise unless you look for it and it reduces the overall audio clarity. So make sure you get this part right.
If you click the settings tab you will find more options such as video frame rate, quality etc. I usually use 30 FPS, H.264 Compression and best quality for my exports.
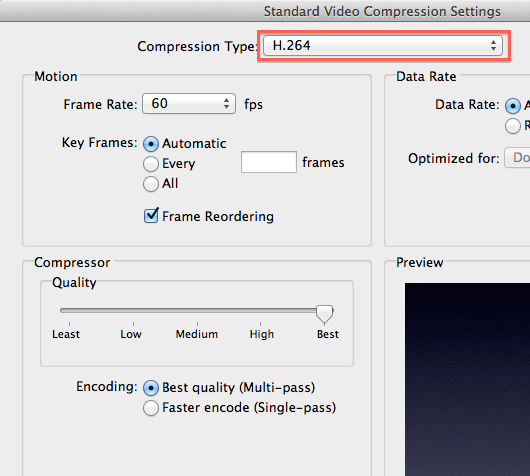
You can use 60 FPS if you want smoother animations but it would be limited to the playback on your PC only. Once you upload it to YouTube, your 60 FPS video will be converted into 30 FPS, so no need to export in 60 FPS if you are using the video to upload to YouTube. 60 FPS would be nearly double the size of 30 FPS videos.
Close the settings box and click Next. Give a name for your new video file and your video will start exporting. It would take a few minutes to get the job done. Once it is finished, go to the export destination and check if your video turned all right.
Conclusion
That’s it for the entire video creation process using Keynote. I hope I have done a good job of explaining all the details involved. If you have any questions, let me know. I will be glad to answer them!